
wooden jewelry box plans pdf
Discover the rewarding craft of building your own wooden jewelry box! Explore plans readily available online, including PDF formats, allowing for personalized designs and lasting treasures.
Why Build Your Own Jewelry Box?
Embarking on a woodworking project like crafting a jewelry box offers a unique sense of accomplishment and personalization. Instead of purchasing a mass-produced item, you gain a beautiful, functional piece tailored to your exact preferences. Utilizing readily available wooden jewelry box plans, even beginners can successfully create stunning boxes.
Furthermore, building your own allows for complete control over materials, ensuring quality and potentially saving money. PDF plans provide detailed instructions, simplifying the process and minimizing errors. The satisfaction of gifting a handmade jewelry box is unparalleled, showcasing thoughtfulness and skill. Ultimately, it’s a rewarding hobby fostering creativity and providing a cherished keepsake.
Brief History of Jewelry Boxes
Historically, jewelry boxes evolved from simple containers safeguarding precious items. Early examples, dating back centuries, were often crafted from basic materials like wood and adorned with minimal decoration. As societies progressed, jewelry boxes became symbols of status and artistry, reflecting prevailing design trends.
During the Victorian era, intricate inlays and luxurious linings like velvet became popular. The availability of detailed wooden jewelry box plans, even in earlier forms, facilitated wider access to crafting these items. Today, the tradition continues, with modern plans – often in PDF format – blending classic techniques with contemporary aesthetics, ensuring the art form thrives.

Types of Wooden Jewelry Boxes
Explore diverse designs, from traditional hinged boxes to elaborate compartment and musical variations, all accessible through readily available wooden jewelry box plans in PDF format.
Traditional Hinged Box Plans
Traditional hinged box plans represent a classic starting point for woodworking enthusiasts. These plans, frequently found as downloadable PDFs, typically detail constructing a rectangular or square box with a lid attached via hinges. Numerous free and paid plans cater to varying skill levels, from beginner-friendly designs requiring minimal cuts to more intricate builds featuring decorative elements.
PDF plans often include detailed cutting lists, specifying wood dimensions for the box sides, bottom, and lid. Step-by-step assembly instructions, sometimes accompanied by illustrative diagrams, guide the builder through the process of joining the wood pieces. Focus is placed on accurate measurements and secure joinery to ensure a sturdy and functional box. These plans are ideal for learning fundamental woodworking techniques and creating a timeless keepsake.
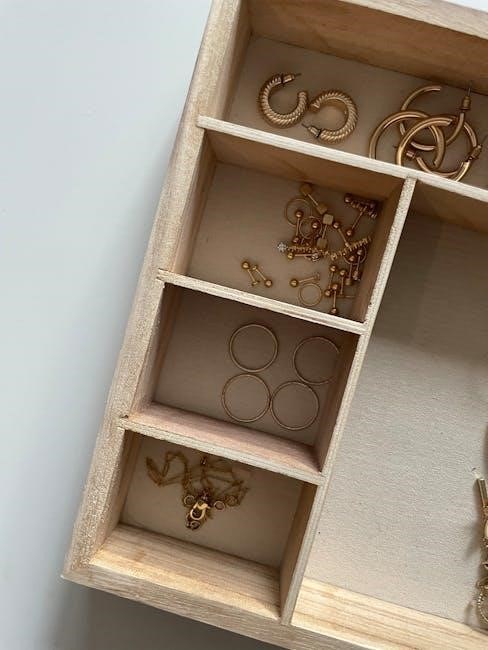
Compartment Jewelry Box Plans
Compartment jewelry box plans, often available as free PDF downloads, offer a step up in complexity from basic hinged designs. These plans focus on creating internal divisions within the box to organize various jewelry pieces – rings, necklaces, earrings, and bracelets. Detailed plans will specify the dimensions and placement of these compartments, maximizing storage efficiency.
PDF resources frequently showcase designs with lift-out trays or removable dividers, adding further customization options. Construction typically involves more precise cutting and joinery to ensure the compartments fit snugly and securely. These plans are excellent for intermediate woodworkers seeking to refine their skills and build a highly functional and aesthetically pleasing jewelry storage solution. Expect detailed diagrams illustrating the internal structure.
Musical Jewelry Box Plans
Musical jewelry box plans, frequently found as downloadable PDFs, represent a more advanced woodworking project. These plans incorporate a musical movement – a small mechanism that plays a tune when the box is opened. PDF guides will detail the specific space required for the movement and how to integrate it into the box’s structure.
Construction involves careful consideration of the box’s lid and base to accommodate the mechanism; Many plans include instructions for mounting the movement securely and ensuring smooth operation. Beyond the woodworking, these plans may touch upon basic wiring if the box includes a light feature. Expect detailed illustrations showing the placement of all components, offering a charming and sentimental keepsake.
Essential Tools and Materials
Successfully executing wooden jewelry box plans, often in PDF format, demands specific tools like saws, drills, and sanders, alongside quality wood and finishing supplies.
Wood Selection: Popular Choices (Walnut, Cherry, Maple)
Choosing the right wood is crucial when following wooden jewelry box plans, especially those found in PDF format. Walnut offers a rich, dark hue and beautiful grain, perfect for elegant boxes. Cherry provides a warm, reddish tone that deepens with age, enhancing the box’s beauty over time.
Maple, a lighter-colored wood, allows for vibrant finishes and detailed carving. Consider the wood’s hardness and workability based on your skill level and the plan’s complexity. PDF plans often specify wood types, but feel free to experiment with others that suit your aesthetic preferences and budget. Remember to source sustainably harvested wood whenever possible!
Tools Required: Saw, Drill, Sander, Clamps
Successfully executing wooden jewelry box plans, including those in PDF format, demands specific tools. A reliable saw – hand saw, table saw, or miter saw – is essential for accurate cuts. A drill with various bit sizes is needed for pilot holes and hardware installation.
Sanding tools, from sandpaper to an orbital sander, ensure smooth surfaces and professional finishes. Clamps are indispensable for securely holding pieces together during gluing and assembly. PDF plans may suggest additional tools, but these four form the foundation for most projects. Prioritize quality tools for precision and safety!
Finishing Supplies: Stain, Varnish, Polish
Transforming a raw wooden jewelry box, built from your chosen PDF plans, into a beautiful heirloom requires appropriate finishing supplies. Wood stain enhances the grain and adds color, offering a wide range of shades.

Varnish provides a protective layer against scratches and moisture, increasing durability. Consider water-based or oil-based varnishes based on your preference. Finally, polish adds a lustrous sheen, completing the refined look. Always follow manufacturer’s instructions for application and drying times. Proper finishing elevates the entire project!
Finding Free Wooden Jewelry Box Plans (PDF)
Numerous websites and online communities offer free wooden jewelry box plans in PDF format, providing a diverse selection for builders of all skill levels.
Reputable Websites Offering Free Plans
Several online platforms consistently provide high-quality, free wooden jewelry box plans available for download as PDFs. Websites dedicated to woodworking, like Woodsmith Plans and Popular Woodworking, frequently feature beginner-friendly designs alongside more complex projects. These resources often include detailed cutting lists, step-by-step assembly instructions, and helpful visual diagrams.
Additionally, sites such as Ana White offer a curated collection of plans, often emphasizing simplicity and affordability. Remember to always verify the source and carefully review the plans before beginning your build, ensuring clarity and accuracy. Exploring these established websites will significantly streamline your search for the perfect jewelry box plan.
Online Forums and Communities

Engaging with online woodworking forums and communities represents a valuable avenue for discovering free wooden jewelry box plans, often shared directly by experienced builders. Platforms like Reddit’s r/woodworking and dedicated woodworking forums host extensive archives of user-submitted plans and project discussions.
These communities frequently offer personalized advice, troubleshooting assistance, and modifications to existing plans. Searching within these forums using keywords like “jewelry box plans PDF” can yield a wealth of options. Remember to critically evaluate plans shared by individuals, verifying their completeness and accuracy before commencing your project.

Detailed Plan Breakdown: A Basic Hinged Box
Follow a clear, step-by-step guide with precise wood dimensions and a cutting list, ensuring successful assembly of a classic hinged jewelry box from PDF plans.
Cutting List and Wood Dimensions
A comprehensive cutting list is paramount for any successful jewelry box build, readily found within detailed PDF plans. Typically, you’ll need pieces for the box’s sides, bottom, and lid. For a basic hinged box, consider these dimensions as a starting point: sides – 6” x 3” x ½”, bottom – 5” x 4” x ½”, and lid – 6” x 4” x ¾”.
These dimensions are adaptable based on your desired box size. PDF plans often specify wood thickness, crucial for accurate joinery. Remember to account for the kerf (width of the saw blade) when cutting. Precise measurements and careful cutting are essential for a professional-looking finish, ensuring a snug fit for all components.
Assembly Instructions: Step-by-Step Guide
Begin by dry-fitting all cut pieces to ensure a precise fit before applying any adhesive. Apply wood glue to the joining surfaces of the box sides and carefully clamp them together, ensuring square corners. Next, attach the bottom piece, again using glue and clamps, allowing sufficient drying time – typically 24 hours.
PDF plans will illustrate joint types (butt, miter, or dovetail). Once the box structure is solid, focus on the lid. Attach hinges according to the plan’s instructions, ensuring proper alignment for smooth opening and closing. Finally, sand all surfaces for a flawless finish, preparing for staining or varnishing.
Hinge Installation and Lid Alignment
Precise hinge placement is crucial for a functional lid. Refer to your PDF plans for specific hinge type and positioning recommendations – typically mortised into both the box and lid. Pre-drill pilot holes to prevent wood splitting during screw insertion. Ensure hinges are flush with the wood surface for a clean look.
Alignment can be tricky; start by loosely attaching the hinges. Test the lid’s opening and closing, adjusting hinge positions as needed. Look for even gaps around the lid when closed. Tighten screws gradually, re-checking alignment after each adjustment for a perfect fit.

Advanced Techniques & Customization
Elevate your project beyond basic PDF plans! Explore velvet lining, intricate inlays, or even hidden compartments for a truly unique, personalized jewelry box.
Adding Velvet Lining
Transform the interior of your wooden jewelry box with a luxurious velvet lining, significantly enhancing its appeal and protecting delicate items. Begin by carefully measuring the inner dimensions of each compartment, then cut the velvet fabric slightly larger to allow for wrapping around the edges.
Apply a thin, even coat of spray adhesive to both the wood surface and the back of the velvet. Gently press the velvet into place, smoothing out any wrinkles or bubbles. For a professional finish, neatly fold and glue the excess velvet around the compartment walls. Consider using different velvet colors for varied compartments, adding a personalized touch to your completed project, guided by your chosen PDF plans.
Incorporating Decorative Inlays
Elevate your wooden jewelry box with stunning decorative inlays, adding a unique artistic flair. Select contrasting wood veneers, mother-of-pearl, or even metal accents to create intricate patterns. Carefully trace your desired design onto the box’s surface, then precisely cut out the inlay area using a sharp chisel or rotary tool.
Fit the inlay material snugly into the recess, securing it with wood glue. Once dry, sand the inlay flush with the surrounding wood surface. Refer to your PDF plans for inspiration or create your own custom designs. This technique transforms a simple box into a treasured heirloom, showcasing your woodworking skills and artistic vision.
Creating Secret Compartments
Add an element of mystery and intrigue to your wooden jewelry box by incorporating hidden compartments! Explore your PDF plans for ideas, or design your own clever concealment. A false bottom, sliding panel, or cleverly disguised drawer can safeguard precious items;
Utilize magnets or subtle latches for seamless operation, ensuring the compartment remains hidden from casual observation. Precise measurements and careful construction are crucial for a functional and undetectable secret space. This feature transforms the box from a storage solution into a captivating puzzle, adding value and personal charm.

Safety Precautions When Working with Wood
Prioritize safety! Always wear eye protection and a dust mask when cutting, sanding, or finishing wood, following your PDF plans carefully.
Eye Protection and Dust Masks
Working with wood, even when following detailed PDF jewelry box plans, generates dust and flying debris. Protecting your eyes is paramount; safety glasses or a face shield are essential to prevent irritation or injury from wood particles. Similarly, inhaling sawdust can cause respiratory problems.
A properly fitted dust mask, or preferably a respirator, filters out these harmful particles. Ensure the mask seals tightly to your face for maximum effectiveness. Consider the type of wood you’re using – some woods are more irritating than others. Regularly change your mask to maintain optimal protection during your woodworking project, guided by your chosen plans.
Safe Use of Power Tools
Implementing safe practices when utilizing power tools is crucial, even when meticulously following PDF jewelry box plans. Always read and understand the tool’s manual before operation. Ensure the work area is well-lit and free of obstructions. Never remove safety guards or defeat safety mechanisms.
Maintain a firm grip and proper stance while operating saws, drills, or sanders. Disconnect power tools before changing blades or bits. Avoid loose clothing or jewelry that could get caught in moving parts. Focus entirely on the task at hand, and never operate tools when fatigued. Prioritize safety throughout your build!

Resources for Further Learning
Expand your woodworking skills with books and online tutorials! Discover detailed guides and PDF plans, enhancing your jewelry box creation journey and expertise.
Books on Woodworking and Jewelry Box Making
Delve into the world of woodworking with comprehensive books offering detailed techniques and inspiring projects. Explore titles focusing specifically on small box construction, joinery, and finishing methods – crucial for crafting exquisite jewelry boxes. Seek out resources that include detailed plans, sometimes even available as supplemental PDF downloads, providing step-by-step guidance.
Consider books covering wood selection, explaining the properties of various hardwoods like walnut, cherry, and maple, ideal for jewelry boxes. Look for publications that demonstrate advanced techniques such as inlay work and creating secret compartments, elevating your designs. Remember to prioritize books with clear illustrations and diagrams to aid understanding and successful project completion, complementing your PDF plans.
Online Video Tutorials
Enhance your jewelry box building skills with a wealth of online video tutorials. Platforms like YouTube offer countless demonstrations, from beginner-friendly introductions to advanced techniques. Search specifically for videos showcasing projects utilizing free PDF jewelry box plans, allowing you to follow along visually.
Benefit from seeing each step of the process – cutting, assembling, sanding, and finishing – brought to life. Look for channels that emphasize safety precautions and proper tool usage. Supplement your PDF plans with these visual guides, gaining a deeper understanding of the construction process. Explore different woodworking styles and customize your box with inspiration from various creators.
Comments (0)